Understanding the pf940v2 jig
What is a pf940v2 jig?
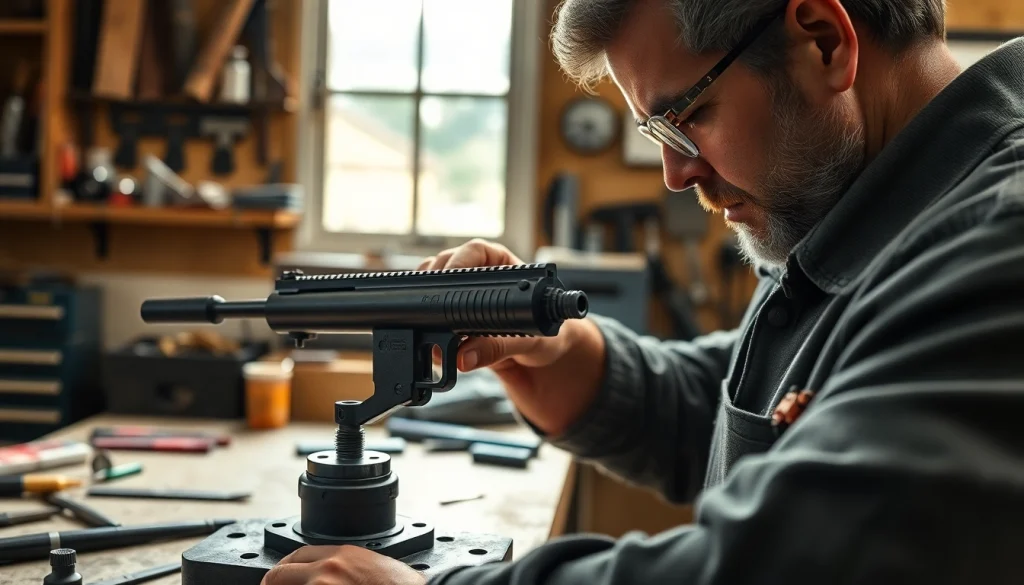
The pf940v2 jig is a specialized tool designed for those interested in building their own firearm frames, particularly polymer frame kits. This jig serves as a guide that assists users in accurately machining the frame while ensuring compliance with manufacturing tolerances. It is crafted for the PF940V2, which is an 80% lower receiver that allows hobbyists and gunsmiths to create their own pistols, ensuring a custom fit and personalized specs.
Benefits of Using a pf940v2 jig
When diving into firearm building, the pf940v2 jig presents numerous advantages:
- Precision and Accuracy: The jig ensures that drilling holes align perfectly, reducing errors during the machining process.
- Cost-Effectiveness: Building a firearm using a jig can save significant money compared to purchasing a fully assembled firearm.
- Customization: Allows for personalized configurations, from grip sizes to finishes, enabling builders to tailor the firearm to their preferences.
- Educational Value: Through the assembly process, users can gain a deeper understanding of firearm mechanics and functions.
Key Features to Look For
When selecting a pf940v2 jig, keep an eye out for the following features:
- Material Quality: A durable, high-quality construction enhances longevity and accuracy.
- Ease of Use: Look for a jig that is user-friendly, particularly for those new to firearm building.
- Integration with Tools: The jig should easily accommodate common tools required for machining.
- Additional Accessories: Some jigs come with extras such as drill bits or guides that simplify the building process even further.
Step-by-Step Setup of the pf940v2 jig
Essential Tools Required
To effectively use the pf940v2 jig, you’ll need a few essential tools:
- Power drill (with the appropriate drill bits)
- Bench vise
- Measuring tools (calipers or rulers)
- Files or sandpaper for finishing touches
- Safety glasses and gloves for protection
Assembly and Calibration
Assembling the pf940v2 jig requires careful calibration:
- Start by securing the jig in a bench vise, ensuring it’s stable for machining.
- Attach the polymer frame onto the jig, aligning it according to the manufacturer’s instructions.
- Double-check alignment using calipers, adjusting as necessary.
Safety Precautions
Safety is paramount when working with tools and firearms:
- Always wear safety glasses to protect your eyes from debris.
- Use gloves to prevent cuts or abrasions while handling tools and parts.
- Ensure that your workspace is uncluttered to avoid accidental injuries.
- Never rush the machining process; taking your time is crucial for safety and accuracy.
Techniques for Effective Use of the pf940v2 jig
Precision Drilling Methods
To achieve the best results with your pf940v2 jig, precision is key:
- Ensure the drill is perpendicular to the surface to avoid angled holes.
- Apply consistent pressure while drilling; avoid pushing too hard to prevent binding.
- Drill at a slow speed to enhance control and reduce friction.
- Periodically remove the drill bit to clear debris and maintain smooth operation.
Common Mistakes to Avoid
Many beginners encounter pitfalls when using a pf940v2 jig:
- Misalignment of the jig—double-check before proceeding.
- Over-tightening the frame in the jig, which may cause cracking.
- Skipping the measurement checks after drilling each hole, leading to cumulative errors.
Best Practices for Accuracy
Following best practices can enhance the outcome of your firearm build:
- Regularly calibrate your tools and ensure they are in good condition.
- Keep measuring tools handy and check measurements frequently.
- Consider practicing on scrap polymer before moving to your actual frame.
- Maintain patient and meticulous workflow, focusing on one step at a time.
Maintenance Tips for a pf940v2 jig
Cleaning and Care Routine
Proper maintenance extends the life of your pf940v2 jig:
- Clean all parts with a soft cloth after each use to remove polymer dust and debris.
- Check for any nicks or wear on the jig and repair if necessary to maintain precision.
- Store the jig in a dry, safe environment to avoid moisture damage.
Storage Solutions
Effective storage solutions help maintain the condition of your jig:
- Utilize a dedicated toolbox or drawer to store your jig and associated tools.
- Label your storage with contents for easy identification.
- Keep the jig elevated off the ground to prevent dust accumulation.
When to Replace Parts
Knowing when to replace parts is crucial for maintaining performance:
- If you notice any visible damage or excessive wear, consider replacing affected parts.
- Monitor the precision of every cut; if accuracy wanes, check the jig components.
- Follow the manufacturer’s recommendations for part lifespan and replacement timelines.
Frequently Asked Questions about the pf940v2 jig
What materials can I use with a pf940v2 jig?
The pf940v2 jig is primarily designed for polymer 80% lower receivers. It works best with high-quality polymer materials.
Is the pf940v2 jig easy to use for beginners?
Yes, it is designed to be user-friendly, with clear instructions that many beginners can follow effectively.
How do I maintain my pf940v2 jig?
Regularly clean the jig after use, check for wear and tear, and store it in a safe location to prevent damage.
Can I use the pf940v2 jig for different firearm models?
This jig is specifically designed for the PF940V2 frame; using it for other models might not provide accurate results.
What is the maximum accuracy achievable with a pf940v2 jig?
When used correctly, builders can achieve impressive accuracy, often yielding results comparable to factory-made firearms.